Planning a trip with friends?
Chat, plan, lists, costs and a live map in one place for the whole group. And it all works with no signal.
 Watch the video · 0:26TripsEvery trip starts in a group chat.Play video
Overview
What planning a group trip looks like today
A group trip usually lives in five apps: a chat, a spreadsheet for costs, a shared note for packing, a pile of map links and someone’s camera roll. Decisions get lost in the scroll, and one person ends up doing all the sums. Otrip puts the whole trip in one place, and does the counting for you.
What Otrip does for you
| Task | By hand | With Otrip |
|---|---|---|
| Deciding | By hand: Scrolling back through the chat to find what was agreed. | With Otrip: Polls and place ideas. An idea joins the plan by itself once enough of the group votes yes. |
| Planning | By hand: Copying links into a shared document. | With Otrip: Destinations, nights, activities and stays on one plan everyone sees, or Plan with AI to fill an empty plan. |
| Packing | By hand: One list and a lot of “who’s bringing what?” | With Otrip: Individual lists everyone ticks for themselves, and shared lists with each item assigned to someone. |
| Costs | By hand: A spreadsheet and long sums at the end. | With Otrip: Split each cost equally or your way. Otrip works out who owes whom, and converts other currencies into your totals. |
| Getting paid back | By hand: Awkward reminders in the group chat. | With Otrip: Send a payment reminder, or record money you received, in one tap. |
| No signal | By hand: Waiting until you are back online. | With Otrip: Everything works offline and syncs when the connection is back. |
| Finding people | By hand: Posting the trip in groups and forums. | With Otrip: Publish a public trip and your followers and travelers nearby are told. |
| Emergencies | By hand: Hoping someone notices a message. | With Otrip: An emergency alert reaches every member, even if they muted the chat, with your location. |
| Memories | By hand: Photos stuck on one person’s phone. | With Otrip: The Travel Tracker records your stops on the trip’s dates, ready for footprints, a book or a reel. |
Who does what
Manage the whole trip: settings, members, the route and shared lists.
Can still post when the chat is set to admins and moderators only.
Chat, vote, add expenses, tick lists and follow the plan.
Create and invite
Start the trip, then bring your group in.
Create the trip
- 1
On Home, tap + on the Travel Tracker card at the bottom, then Trip.
- 2
Add a cover photo and a Trip name. A start location, start date and description are optional.
- 3
Under Who can see this trip, choose Private (invite only; only members can see it) or Public (anyone can find it and ask to join). Tap Create trip.
- 4
For a public trip, set the Trip rules and Join requirements, then tap Publish trip. Your followers and travelers nearby are told about it.
Invite your group
- 1
Right after you create a trip, the invite sheet opens. Later, find it in Trip Settings → Invite travelers.
- 2
Search by name or username and select people, then tap the invite button.
- 3
Or tap Share Trip or Copy Join Link and send the link in any app.
Members and joining
Choose who can join, and how the group talks.
Requirements, rules and questions are shown before anyone joins.
Join requests wait in Trip Settings for an admin to accept.
Invited people see the trip under Invites on their Home.
- 1
Open Trip Settings (the gear at the top of the trip).
- 2
In Join requirements, set the Group size, a Minimum budget per person, an Age range, Languages and Gender, and add questions. Only the trip’s admins see the answers.
- 3
Add Trip rules; everyone in the trip agrees to them.
- 4
Under Members, people who Requested to join wait for you to Accept or Decline.
- 5
Tap a member to Make admin, Make moderator or Remove from trip.
- 6
In Who can post, choose Everyone or Admins and moderators. In the second, members can still react and always keep the Emergency button.
Chat and decisions
Talk it through, then let the group decide.
Votes are counted as people tap.
A place idea is added to the plan by itself once enough of the group votes yes.
Chat
- 1
Type in the Message box, or hold the microphone to record a voice message.
- 2
Tap + to share from the Camera or Gallery, a Document or your Location.
- 3
Swipe a message to reply. Long-press it to Reply, Forward, Pin, Edit or Delete.
Polls
- 1
Tap + → Poll. Write the Question and up to 10 options, and turn on Allow multiple selections if you like.
- 2
Tap Create Poll. Long-press it later to View votes or Close Poll.
Place ideas
- 1
Tap + → Idea. Choose Destination or Activity, paste a Google or Apple Maps link or name the place, and say why.
- 2
Tap Post idea. Everyone votes Yes or No.
- 3
The card shows how many votes it needs. Once enough say yes, it is In the plan.
Plan the route
Build the trip stop by stop, day by day.
- 1
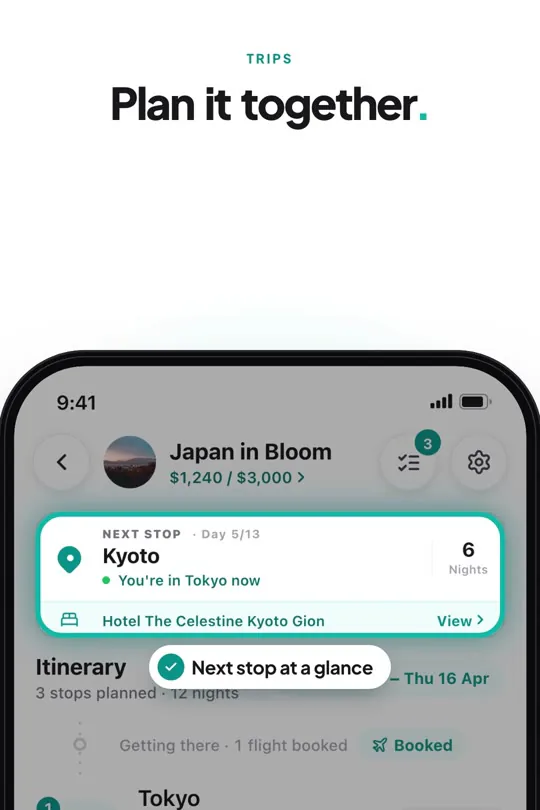
Tap the Next stop card at the top of the chat. The plan opens over the trip map.
- 2
Tap Add destination, pick a place and set the Nights.
- 3
Open a destination to Add Activity, Add a stay, or paste a Google or Apple Maps link.
- 4
Switch between Stops and Full plan to see one stop at a time or the whole trip day by day.
- 5
With an empty plan, tap Plan with AI: choose where from and to, how you get around, when and how many of you, then tap Generate plan.
Only trip admins plan the route. Plan with AI is part of Otrip Pro and needs a connection; adding destinations works offline.
Lists
Packing and to-dos, for each person or for the group.
- 1
Tap the tasks button at the top of the trip chat, then Add list.
- 2
Pick a ready-made template, one of Your lists, or Create custom list.
- 3
Choose Individual list (each person ticks their own) or Shared list (everyone sees it, and items can be assigned).
- 4
On a shared list, assign an item to someone, or to All members to include anyone who joins later.
- 5
Use Save as template to reuse the list on your next trip.
Only trip admins can create shared lists. Saving your own templates is part of Otrip Pro.
Expenses and budget
Everyone adds what they paid, and Otrip does the sums.
Each expense is split the way you choose, and the balances update straight away.
Settlements show who pays whom, so nobody has to work it out.
Expenses in another currency are converted into your totals.
- 1
Tap + in the chat → Expense. Enter the Amount, what it was for, a category and who it was Paid by.
- 2
Choose Personal or Group Split. Split it Equal, Custom, by percentage or by shares, and attach a photo of the receipt if you like. Tap Add Expense.
- 3
Tap the amount under the trip name to see every expense and the Settlements.
- 4
Tap someone who owes you to Send payment reminder or Record money received.
- 5
Tap Set Budget to set your own budget. Only you can see it.
- 6
Use Export Expenses to share the full list.
Payment reminders and exporting expenses are part of Otrip Pro.
On the road
Find each other, ride together and stay safe.
Live location sharing switches itself off when the time is up.
An emergency alert pushes to every member, even if they muted the chat.
Map and live location
- 1
Tap the map button beside the message box. Switch between Route (the plan) and Members (where everyone is).
- 2
In Trip Settings, turn on Share my live location so trip members see you on the map. It shows Sharing until with the time it stops.
Ride together
- 1
On the Members map, tap Start ride. Everyone riding shows on the map, with the convoy order and speed.
- 2
Tap Stop ride at the end for a summary of distance, duration and speed.
In an emergency
- 1
Tap + → Emergency, pick what happened and Hold to send. Your location is attached.
- 2
In Trip Settings → Who sees my emergency info, choose Admins, Everyone or Nobody for this trip.
Documents and bookings
Tickets, passports and bookings, ready offline.
- 1
On Home, tap Docs → Add document, choose a file and use Attach to trip to link it to this trip.
- 2
Find stays, flights and more in the Bookings tab. You book on the partner’s own site.
- 3
Back in Otrip, tap I booked it, save the details and Add to a trip. It goes straight onto that stop in the plan, where the group sees it.
Documents stay on your phone and open with no signal. Cloud backup of documents is part of Otrip Pro.
After the trip
Keep the journey long after you are home.
With Auto-track my trips on their dates on, the Travel Tracker starts on the trip’s first day and stops the day after it ends.
Stops it finds become drafts, ready for photos.
- 1
Post your drafts as footprints, linked to the trip, from the Travel Tracker card on Home.
- 2
On the trip map, tap Travel Book to turn the trip into a book you can flip through.
- 3
Tap Reels to make a short video of the journey.
Making and reading a Travel Book is free. Sharing it as a PDF is part of Otrip Pro.